# 組件間的資料傳輸
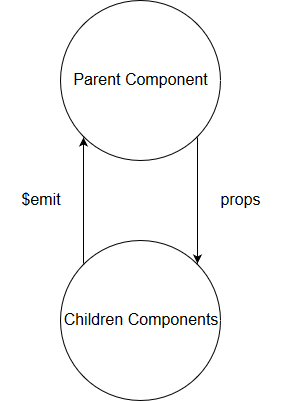
父組件及子組件由於屬於不同的實體,不能直接在一個組件上使用另一個組件的方法或是修改資料,而是必須要使用 props 屬性及 $emit 方法來進行溝通。

子組件只要在 props 屬性加上需要由父組件傳入的參數定義,父組件就可以在配置子組件的時候給予子組件所需的參數屬性,而如果子組件因為變動需要通知父組件,就可以使用 $emit 通知父組件,而父組件只要設定相關事件的處理函數就可以接收到子組件的資料。
# 父組件使用屬性傳資料給子組件
在子組件使用 props 屬性註冊客製屬性,由父組件設定在子組件的屬性會變為實體中的屬性,如此一來就可以在子組件中使用由父組件傳來的資料。
跟前一篇一樣使用計算按鈕為例:
Vue.component('button-counter', {
  template: `
    <button @click="count+=1">
      {{buttonName}} {{count}} times
    </button>
  `,
  props: ['buttonName'],
  data: function() {
    return {
      count: 0,
    };
  },
});
在 props 中設定 buttonName ,表示 buttonName 是一個客製屬性,會由父組件在設定模板時給予它的值。
接著設定父組件:
<div id="app">
  <button-counter button-name="Click me"></button-counter>
</div>
var vm = new Vue({
  el: '#app',
});
在父組件上以 kebab Case 設定客製屬性 button-name ,將它的值設為 Click me 。
接著我們可以看到結果如下圖:
也可以使用 v-bind 綁定資料屬性:
var vm = new Vue({
  el: '#app',
  data: {
    buttonName: ''
  }
});
<div>
  <input v-model='buttonName'>
  <button-counter :button-name="buttonName"></button-counter>
</div>
# 使用 v-for 帶入屬性
大部分的時候我們都會是有一包資料,這包資料中的每一筆都有多個屬性,因此想要在頁面上顯示這樣的資料時,可以使用組件跟 v-for 的組合來完成。
例如,我們需要有多個計數器,每個計數器會有一個標題及一對加減按紐:
Vue.component('counter', {
  template: `
    <div>
      <h3>{{title}}</h3>
      <button @click="count+=1">{{plusBtnName}}</button>
      <button @click="count-=1">{{minusBtnName}}</button>
      Count: {{count}}
    <div>
  `,
  props: ['title', 'plusBtnName', 'minusBtnName'],
  data: function() {
    return {
      count: 0,
    };
  },
});
註冊 counter 組件,這個組件有三個 props 屬性: title 、 plusBtnName 及 minusBtnName 。
接著在 new Vue 實體上設定 v-for 要巡覽的資料:
var vm = new Vue({
  el: '#app',
  data: {
    counters: [{
      title: 'Counter',
      plusBtnName: '+',
      minusBtnName: '-'
    }, {
      title: 'Counter',
      plusBtnName: 'Plus',
      minusBtnName: 'Minus'
    }, {
      title: '計數器',
      plusBtnName: '加',
      minusBtnName: '減'
    }]
  }
});
接著在模板上配置 v-for 屬性渲染頁面:
<div>
  <counter v-for="counter in counters"
           :title="counter.title"
           :plus-btn-name="counter.plusBtnName"
           :minus-btn-name="counter.minusBtnName"></counter>
</div>
這樣就可以完成設置了,結果如下圖:
# 減少傳入的屬性量
上例我們設定了三個屬性要傳入子組件中,可是它們都屬於 counter 資料物件,因此我們可以直接傳入 coounter 物件就好。
修改 counter 組件設置如下:
Vue.component('counter-simple', {
  template: `
    <div>
      <h3>{{counter.title}}</h3>
      <button @click="count+=1">{{counter.plusBtnName}}</button>
      <button @click="count-=1">{{counter.minusBtnName}}</button>
      Count: {{count}}
    <div>
  `,
  props: ['counter'],   // 簡化為 counter 屬性
  data: function() {
    return {
      count: 0,
    };
  },
});
<div>
  <counter-simple v-for="counter in counters"
                  :counter="counter"></counter-simple>
</div>
父組件只需要傳入 counter 屬性。
# 使用 $emit 反應子組件中的變化
當事件或是監聽器觸發時,子組件可以用 $emit 方法將變化反應給父組件知道。
還是以 button-counter 為例:
Vue.component('button-counter', {
  template: `
    <button @click="clickPlus">
      {{buttonName}} {{count}} times
    </button>
  `,
  props: ['buttonName'],
  data: function() {
    return {
      count: 0,
    };
  },
  methods: {
    clickPlus: function() {
      this.count += 1;
      this.$emit('click-plus');
    }
  }
});
click 事件改為叫用 clickPlus 方法,這個方法做了兩件事:
- 將
count加一。 - 叫用父組件的
click-plus事件。
接著只要在父組件中的 button-counter 中設定 click-plus 事件的綁定就可以監看此事件:
<div>
  {{count}}
  <button-counter button-name="Click me" @click-plus="count += 1"></button-counter>
</div>
如此一來我們就可以更新父組件內的 count 了。
# 將子組件中的資料傳給父組件
剛剛的例子有一個問題: 父組件的 count 並沒有跟 button-counter 中的 count 同步,為了解決這個問題,我們可以將 button-counter 內的 count 傳給父組件。
methods: {
  clickPlus: function() {
    this.count += 1;
    this.$emit('click-plus', this.count);
  }
}
$emit 第二個參數傳入想要傳給父組件的資料,這裡是 count 。
接著在父組件中使用 $event 當作傳回的資料做處理:
<button-counter button-name="Click me" @click-plus="count=$event"></button-counter>
如果使用方法名稱的方式設定客製事件,第一個參數就是傳入的資料:
<button-counter button-name="Click me" @click-plus="clickPlus"></button-counter>
methods: {
  clickPlus(count) {
    this.count = count
  }
}
如此一來就解決了同步的問題。
# 在組件上使用 v-model
在來複習 v-model ,它是雙向綁定的屬性,如下面的範例設定:
<input v-model="inputSomething">
v-model 其實是 value 及 @input 的語法糖,也就是提供開發者叫簡潔的定義方式,所以他原本是:
<input :value="inputSomething" @input="inputSomething=$event.target.value">
- 將
value屬性的資料綁定到 DOM 元素上的value。 input事件觸發時將value的資料改為新的值。
因此要在客製的 input 組件上使用 v-model 的話,需要做下面三點設定:
- 傳入
value客製屬性。 - 在目標 DOM 元素上將傳入的
value客製屬性綁定到 DOM 元素上的value屬性。 - 在目標 DOM 元素更新資料,也就是觸發
input事件的時候,使用$emit觸發上層的input事件,並帶入改變後的值。
Vue.component('custom-input', {
  template: `
    <div>
      <h3>{{title}}</h3>
      <input :value="value"
             @input="$emit('input', $event.target.value)">
    <div>
  `,
  props: ['title', 'value'],
});
接著在父組件上的 custom-input 設定 v-model 屬性:
<input v-model="inputSomething">
記住 v-model 是 :value 及 @input 的語法糖, inputSomething 會綁定 value 的值,並且會隨 input 事件所更新。
# DEMO
# 結語
本文承接前一篇介紹的組件,更進一步的說明組件間的傳遞方式,上對下的是使用 props 屬性,下對上使用 $emit 方法,而最後透過已學習到的組件傳遞方式講述 v-model 在組件上如何使用。
到這章為止,基本的 Vue.js 使用方式已經有了較全面的了解,可以開始著手些一個小專案了,接下來我們將深入講解組件各式各樣的設定。